Prenatal Practice - 15 to 30 MinuteS
by Linda Spackman
This prenatal practice is to inspire all pregnant women to take a few moments for themselves in order to experience both physical relief from common discomforts and emotional stability that can be the result of regular yoga practice. This sequence can be done in as little as 15 minutes or for as long as half an hour.
Purpose of the Sequence
- Relieve pressure in the abdomen and breast area to create space for the growing baby.
- Encourage relaxation and an inward focus – very important for pregnancy as well as the early stages of motherhood.
Guidelines/Cautions
- Begin this practice after 14 weeks
- The very short sequence can be done daily.
- You can skip poses in the sequence if something does not feel right.

Baddha Konasana
Benefits
- Yoga books state that the practice of this pose will facilitate easy delivery. (Well, perhaps easier than if we didn’t!)
Instructions
- Sit with buttocks elevated
- Sacrum and thoracic at wall
- Soles of feet together near perineum
- Knees wide apart and relaxed toward floor
- Lift chest and bring outer shoulder blades toward the wall
- Head on line with lift of spine

Upavista Konasana
Benefits
- Can be done in early labor, facilitates easy(ier!) delivery.
Variations
- Back at wall allows for longer hold
- Sitting upright strengthens back
- Can be done twisting
Instructions
- Sit with buttocks elevated
- Sacrum and thoracic at wall
- Take legs evenly wide
- Press backs of legs down
- Extend sides of trunk upwards

Tadasana
Benefits
- Builds awareness of correct posture
Instructions
- Stand with feet hip width apart
- Press down through feet and pull up through legs
- Open and lift the chest
- Stretch fingers down
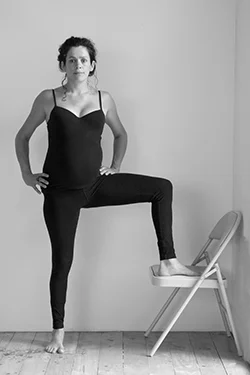
Vrksasana
Benefits
- Uplifting
Instructions
- Stand in Tadasana
- Place right foot on chair
- Right shin vertical
- Raise arms
- Lower arms
- Change legs and repeat other side

Parsva Utthita Hasta Padangustasana
Benefits
- Opens pelvis
- Relieves sciatica
Instructions
- From Vrksasana
- Place hand under bent leg knee and raise heel to chair or foot to wall
- Place hands on pelvic rim
- Press hands to pelvic rim to lift waist
- Tuck shoulder blades onto back to raise sternum

Parsvakonasna
Benefits
- Strengthens legs, opens hips and pelvis
- Variation
- Can be done with heel at wall like Trikonasana
Instructions
- Bend right leg to slightly greater than right angle
- Stretch back leg completely
- Extend right side trunk over right thigh
- Stage 1: Place forearm on bent thigh to roll thigh externally. Place back hand on hip.
- Stage 2: Place hand on block. Extend arm from shoulder.

Ardha Candrasana
Benefits
- Relieves morning sickness, brings lightness in pelvis
Instructions
- Block at wall
- Side of standing foot 3-6" away from wall
- From Trikonasana, bend right knee and reach for block
- Lift left leg to parallel with floor
- Straighten standing leg
- Roll left pelvic rim upwards to open across pelvis
- Stretch left arms up to stretch across chest
- To release, bend right knee
- Lower left foot to floor and swing up to standing
- Repeat other side

Malasana
Benefits
- Opens pubic symphysis, tones pelvic floor
- Grounding, restful. Use as interim resting pose.
Instructions
- Stand with back at wall
- Place blocks 2-3" away from wall
- Turn legs and feet out
- Slide down wall to sit on blocks

Back Vinyasa
Benefits
- Excellent warm-up for spine, can be used to move fetus into more comfortable position for pregnancy, labor and delivery, especially useful during back labor
Instructions
- Place palms firmly on floor slightly forward from shoulders
- Place knees hip width apart, stretch toes back
- Exhale round middle spine upward without contracting abdomen
- Inhale arch middle back to floor

Childs pose
Benefits
- Spreads sacrum, restful
Instructions
- On shins with toes together
- Spread knees wide apart wider than usual
- Keep buttocks toward heels
- Extend forward to rest forehead on floor or prop

Supta Baddhakonasana and or Side-lying Savasana
Benefits
- Very comfortable (this is why most of my students come to class!)
Instructions for Supta Baddhakonasana
- Sit with bolster 2-4 inches behind pelvis
- Place soles of feet together with heels close to perineum
- Place blankets to support outer thighs near the knees
- Recline spine to support of bolster(s)
- Place back of head on folded blanket
- Place arms as in Savasana
- Support elbows if they float
- Remain in pose for 5-10 minutes
- To release, bring hands to outer thighs
- Use arms strength to lift knees and place feet on the floor
- Roll to right side and use arm strength to raise torso
Instructions for Side-lying Savasana (after 4 months)
- Recline on the most comfortable side
- Place support between thighs and feet
- Place support between head and arm
- Palm of lower arm faces ceiling
- Close eyes and direct senses inward
- Remain still for 5–10 minutes
- To release, take a few deeper breaths
- Use arm strength to come to sitting
Roll to the side and use strength of arms to come to up.
Finish practice by sitting quietly.
Prepare to focus your energy and attention outwardly by first reflecting on gratitude for the practice. Then set your intention to bring any clarity and insight you gained from the practice into your relationships and toward fulfilling your responsibilities.
Please be encouraged to take even a little time to nourish yourself with this practice. It is designed to support you during this important and transformative time.
Namaste